How to build a Shoppable Campaign Page
Turn your product inventory into engaging shopping experiences. Create multi-page campaigns with eye-catching banners and organized product sections that make it easy for buyers to discover, browse, and shop your products.
Choose a Shoppable Campaign Page if you have a large product range and want customers to browse, search, and shop your products. For smaller selections, see our Product Slider feature.
You'll need a Data Source with your product details and images before you begin.
To create a Shoppable Campaign Page, follow these steps:
Step 1. Make sure you have a Data Source
A Shoppable Campaign Page needs access to your product details and images, which come from a Data Source. A Data Source can be a CSV/feed file, an API connection, or products added manually. It's created separately from your campaign, so we recommend setting it up before you start. For step-by-step instructions, see How to create or upload your Data Source.
Step 2. Create the campaign
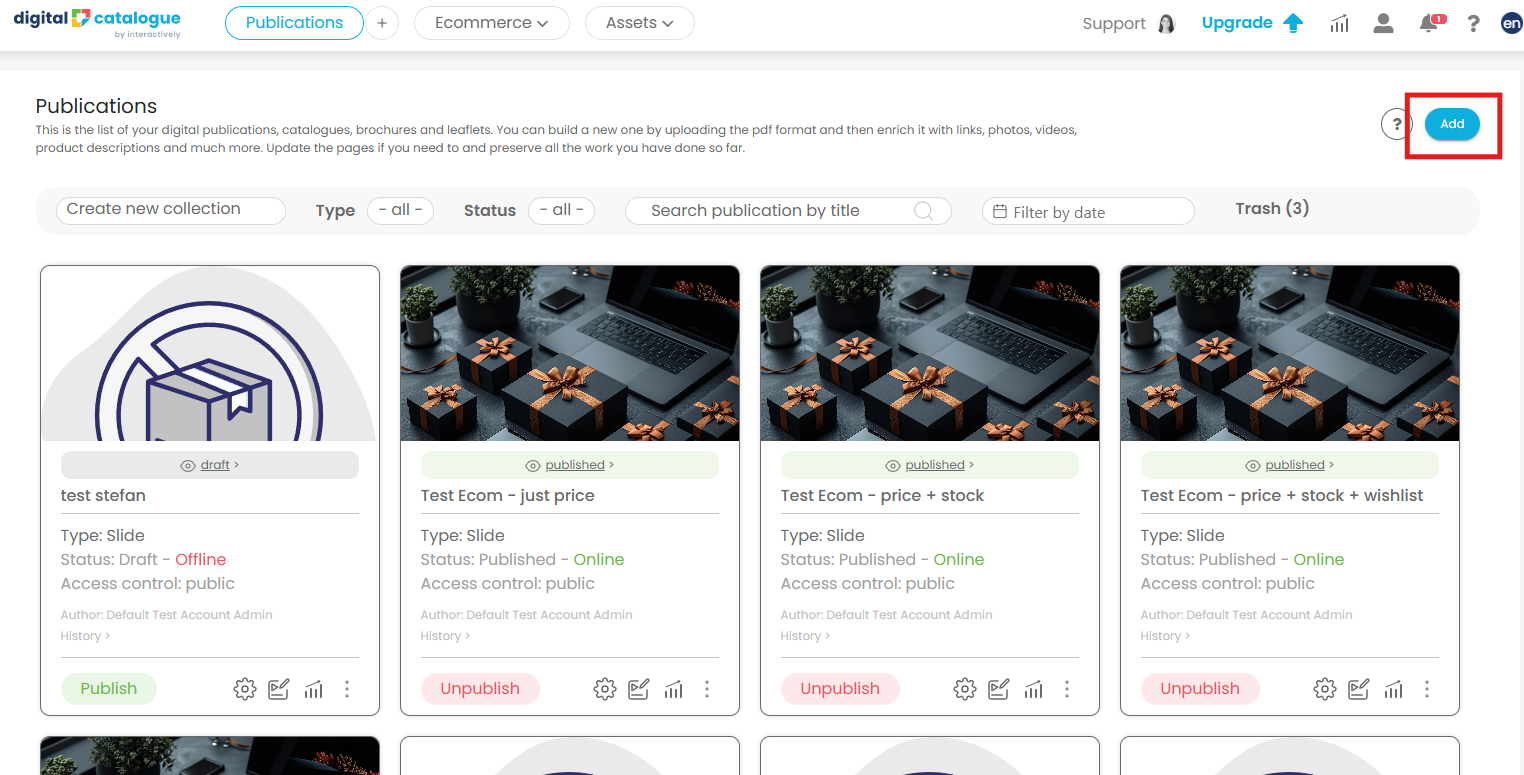
1. In your publication list, click Add.
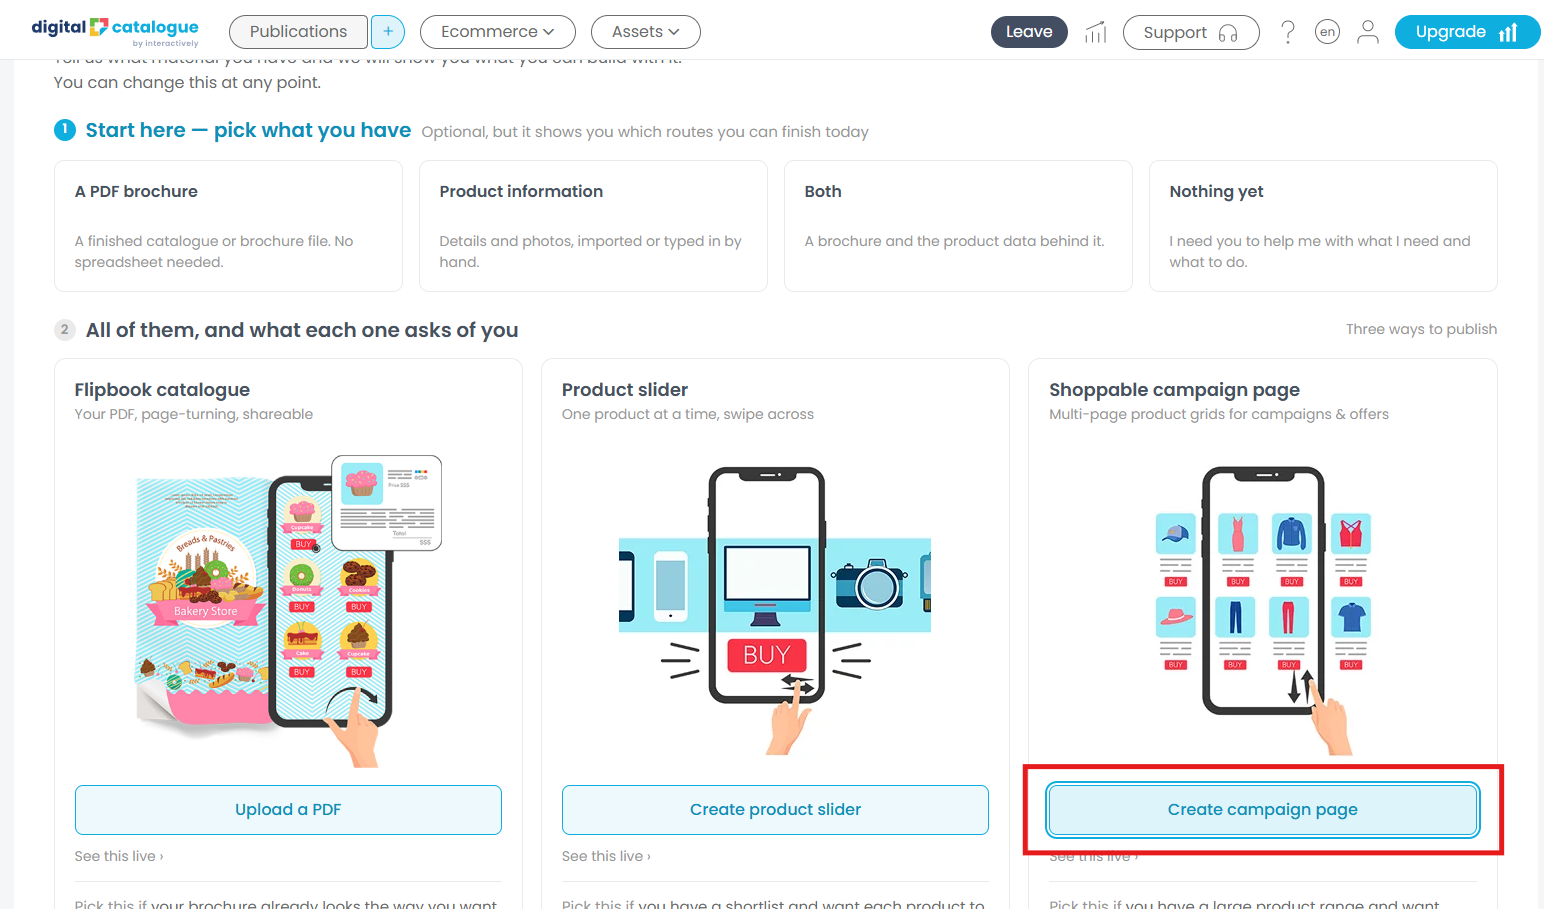
2. On the Shoppable Campaign Page card, click Create campaign page.
A prompt will tell you that products are required. Click Create campaign to continue.
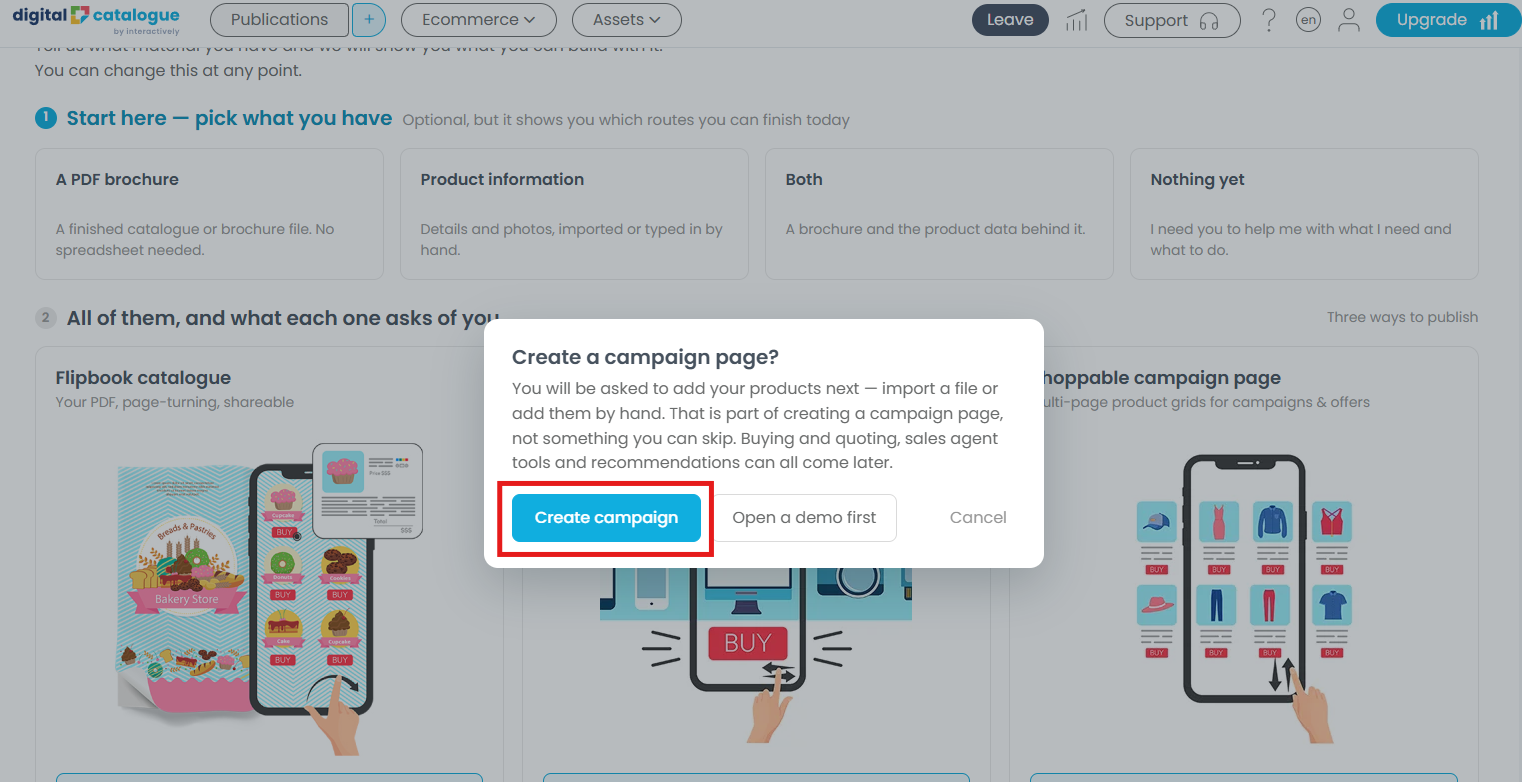
Note: Connecting products is required and can't be skipped. You can set up Buying & Quoting, Sales Agent, and Recommendations later.
Step 3. Connect your Data Source
You'll be taken to the Products section. Select your existing Data Source to give the campaign access to your products.
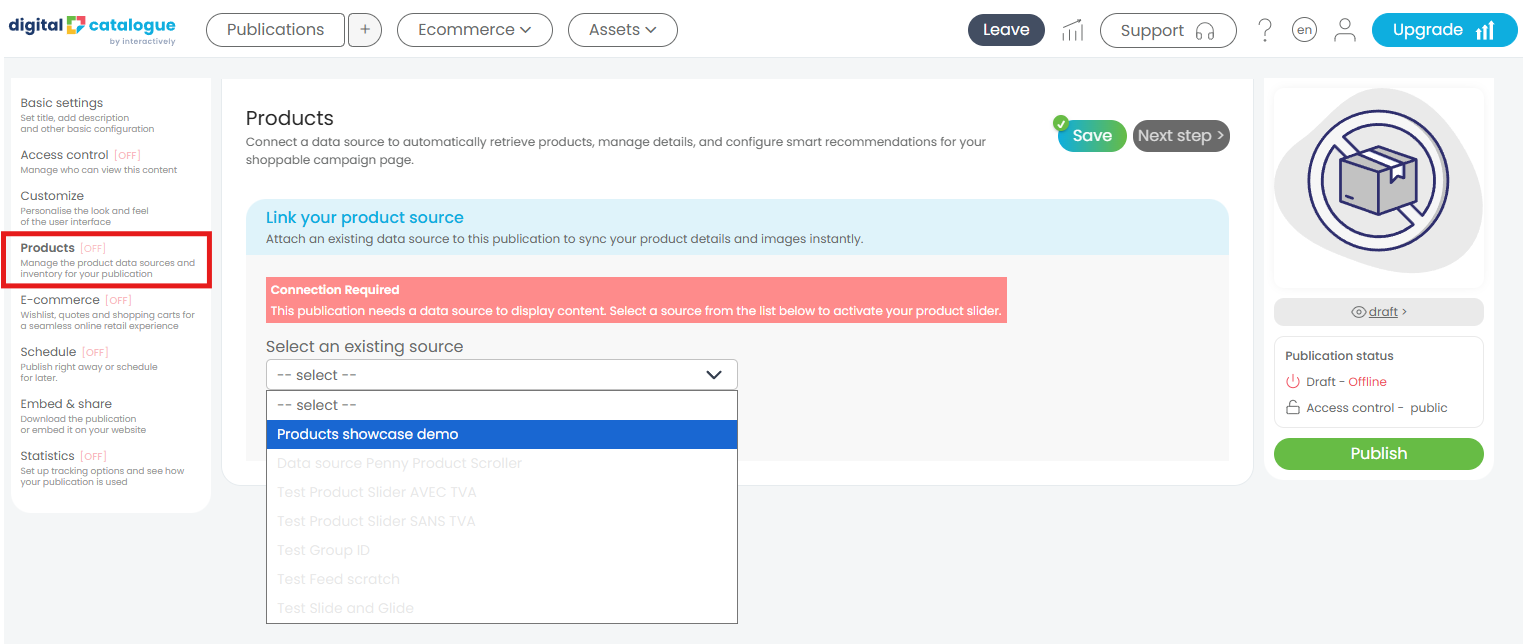
Step 4. Create your campaign pages
This is where you build the pages that organize your products into different sections or categories.
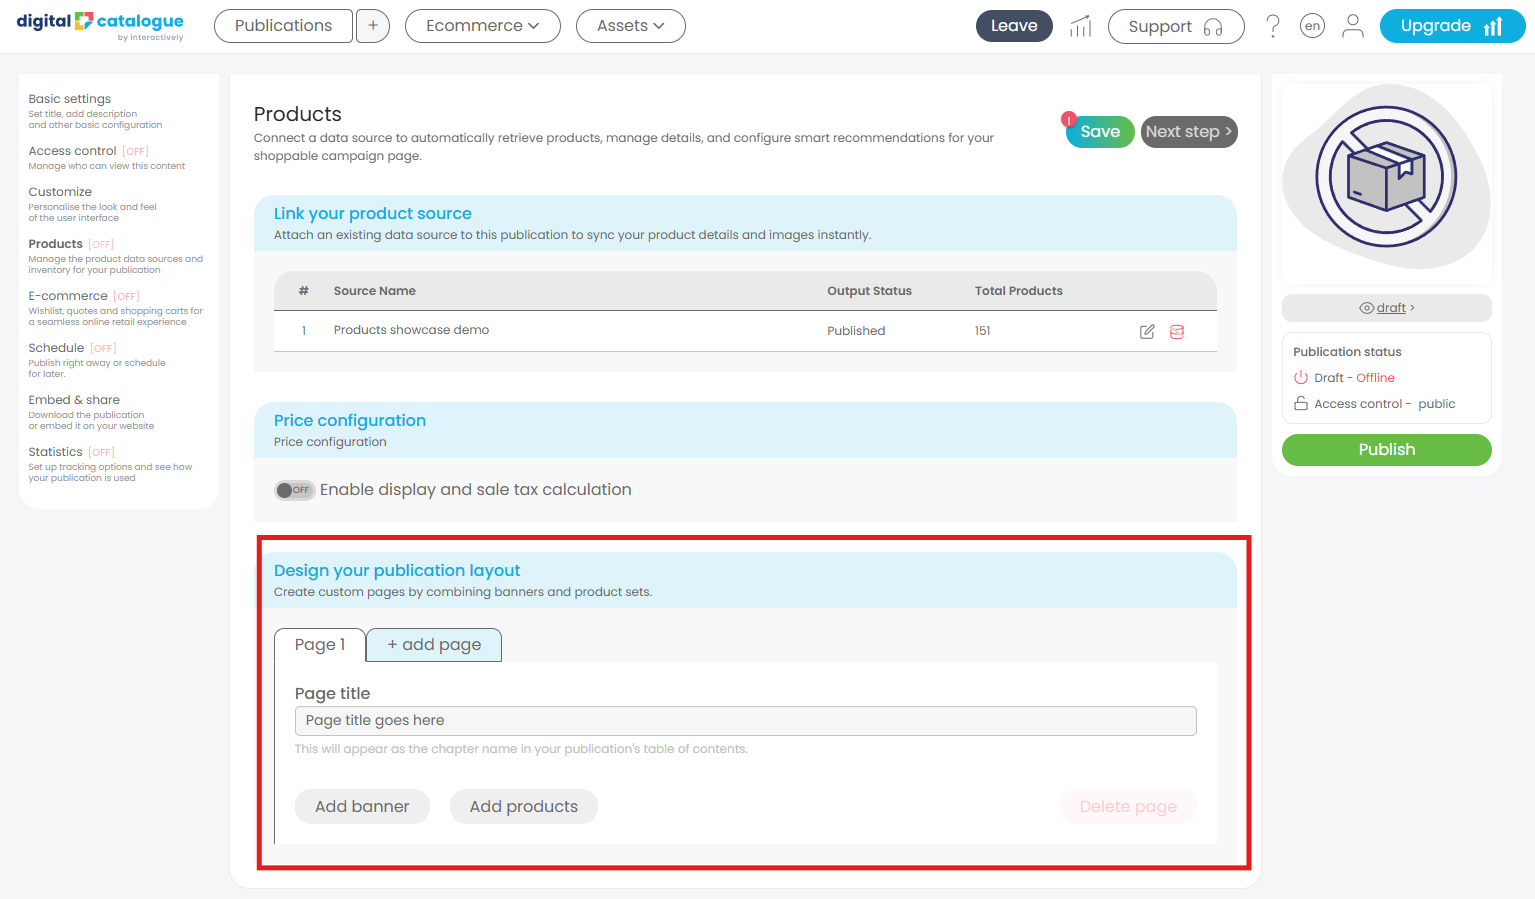
I. Add a page title
Add a Page Title to name your page. This title will appear as the chapter name in your publication’s table of contents. Adding a title is optional, but recommended for easier navigation.
II. Add a banner
Make your page more engaging with a promotional banner.
In the Banner section:
- Optionally, add a title and description to display on the banner.
- Select an image from your Media Library.
- Optionally, add separate desktop and mobile images so the banner looks its best on each device. If you only add one, it's used for both.
- Choose how the image is displayed:
- Fit – displays the entire image without cropping.
- Fill – fills the available space and may crop part of the image.
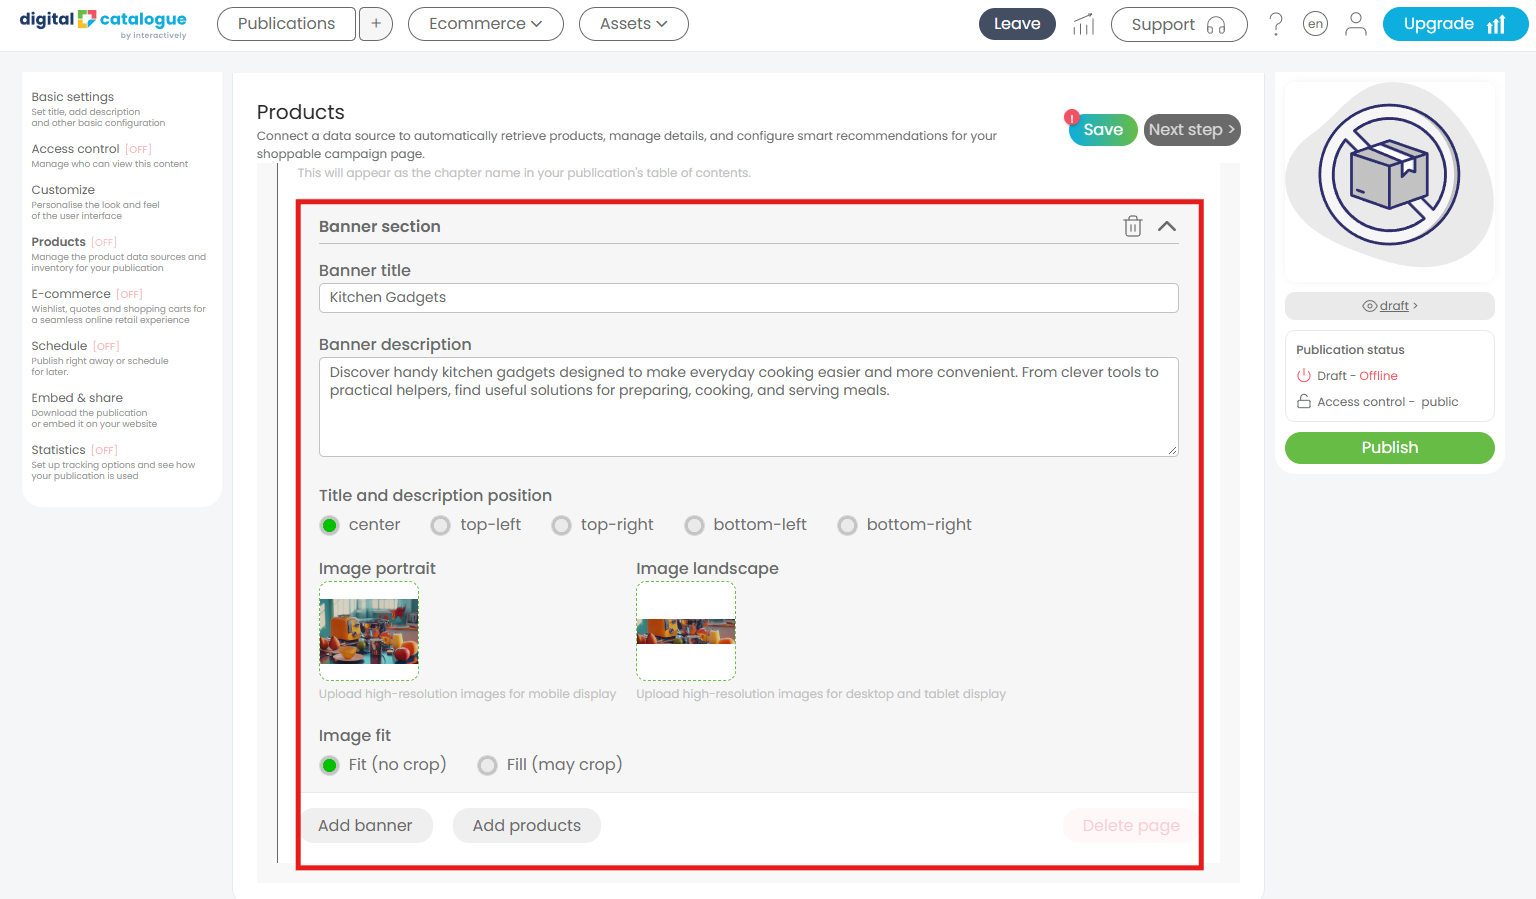
Note: The banner title appears on the banner itself. The Page Title from the previous step only appears in the table of contents.
III. Add products
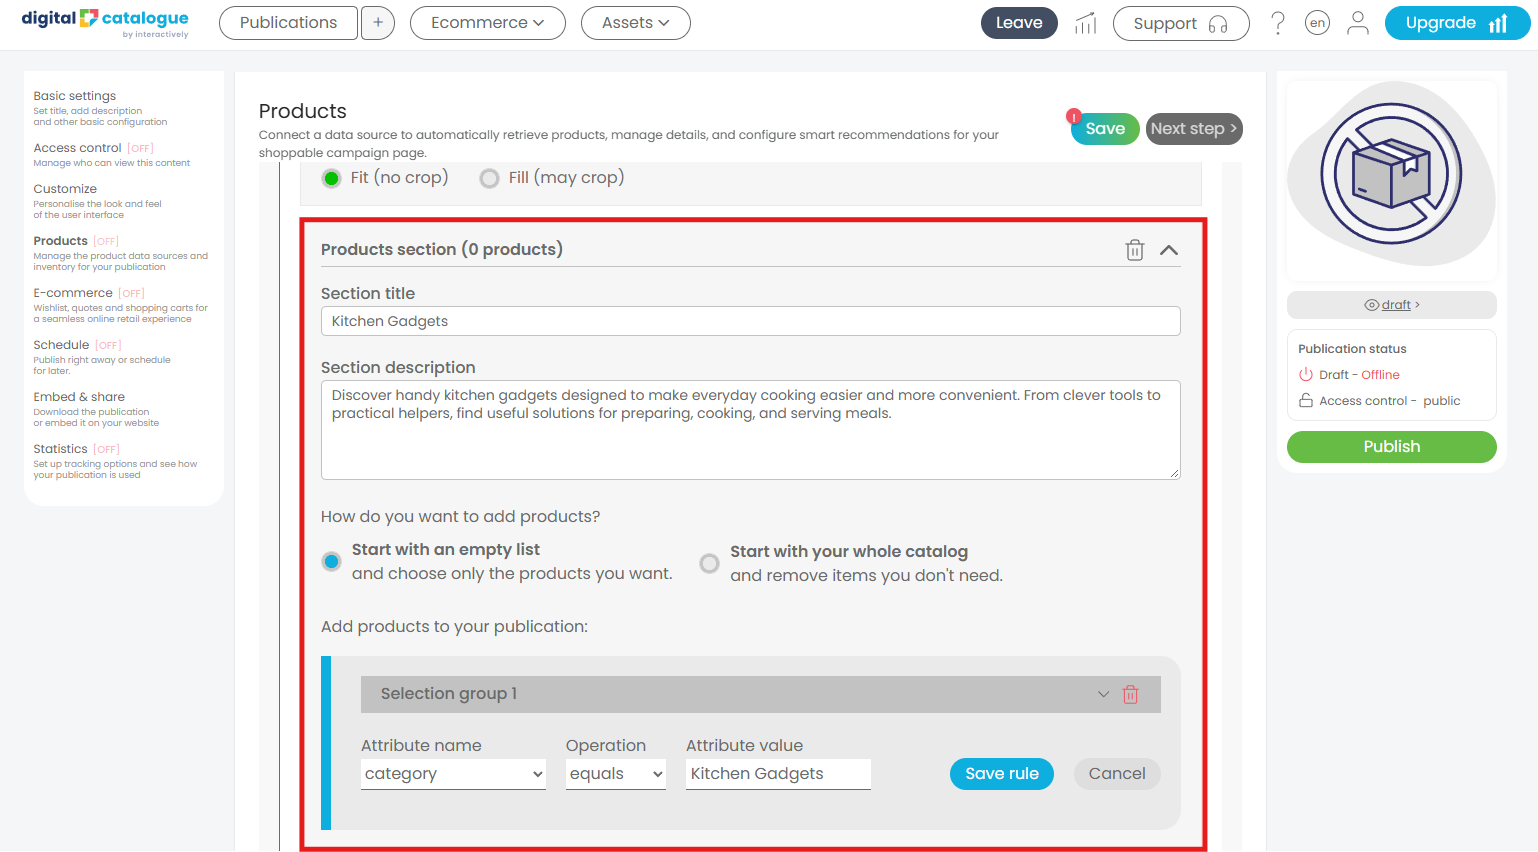
Use the Products section to create a product section on your page. Give it a section title and description (both optional), then choose which products to display. You can narrow your selection with filters such as Category, Product ID, or Price range.
Choose how to build your selection
You can start from either of two points:
- Start with an empty list – use rules to add products to your selection.
- Start with full product data – use rules to remove products from your selection.
Option 1: Start with an empty list
Choose this option when you want to build your product selection from scratch. The list starts empty, and you create one or more selection groups, each containing rules that define which products to add.
Example: Create a “Kitchen Gadgets” section
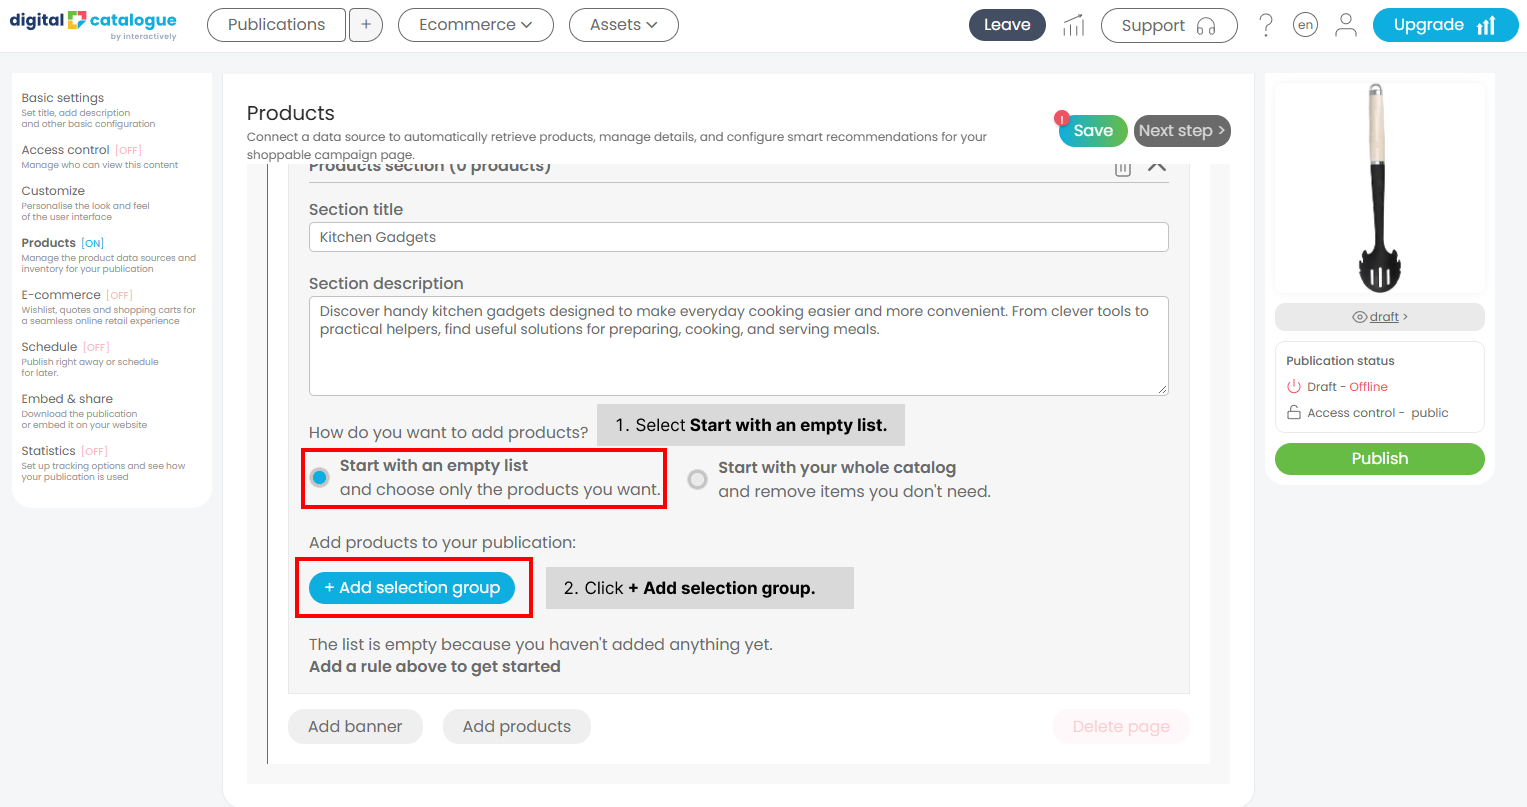
In the Products section, enter the section title Kitchen Gadgets. You can also add a compelling description if needed. Then:
- Select Start with an empty list.
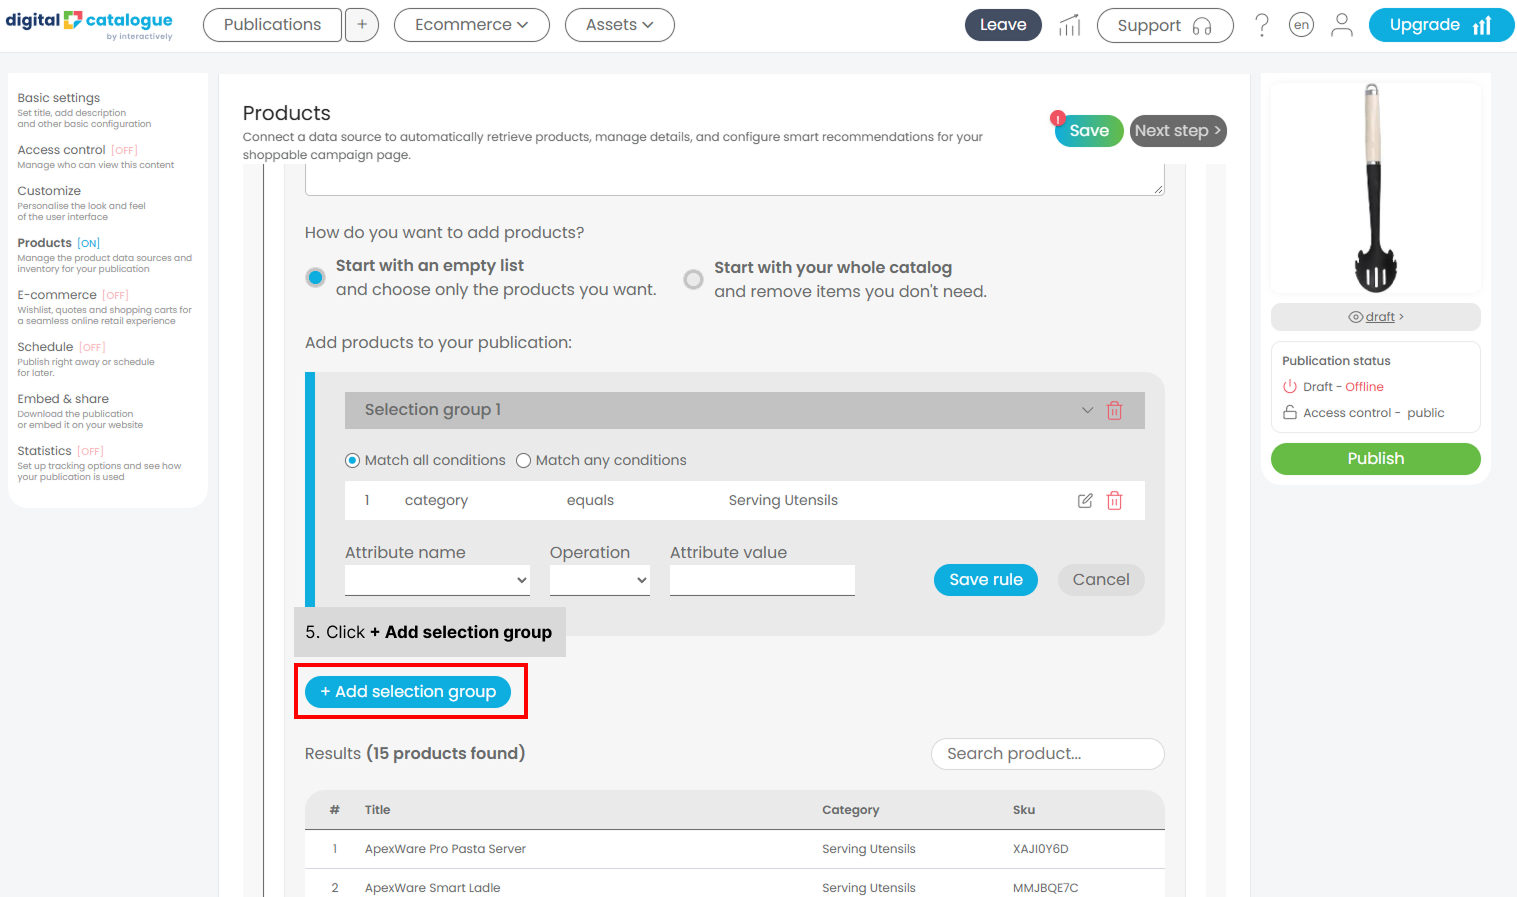
- Click + Add selection group.
- Click Add rule.
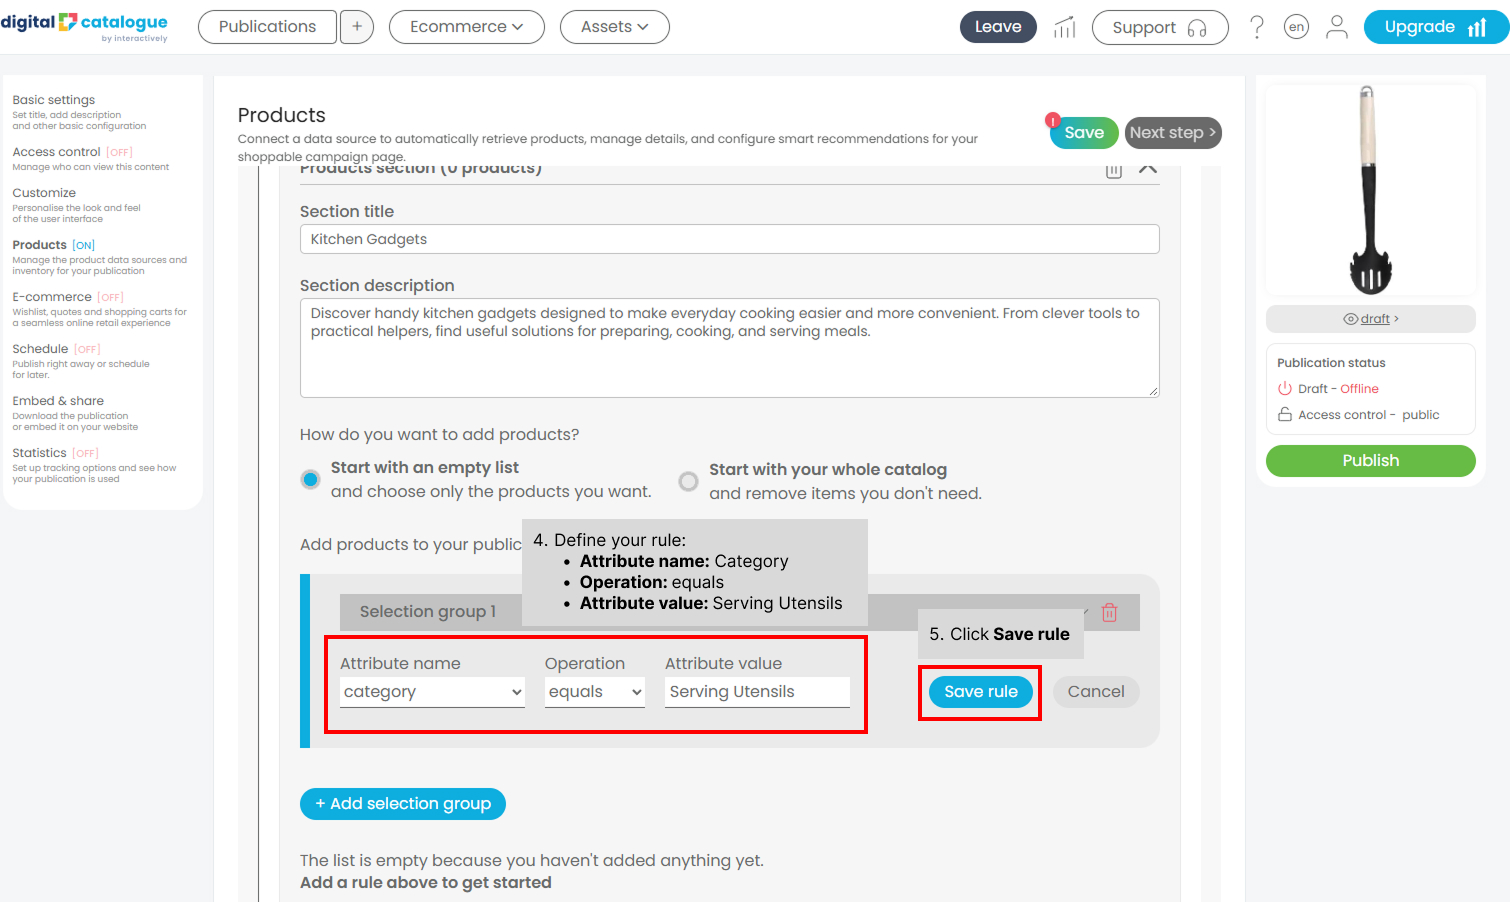
- Define your rule:
- Attribute name: Category
- Operation: equals
- Attribute value: Serving Utensils
- Click Save rule.
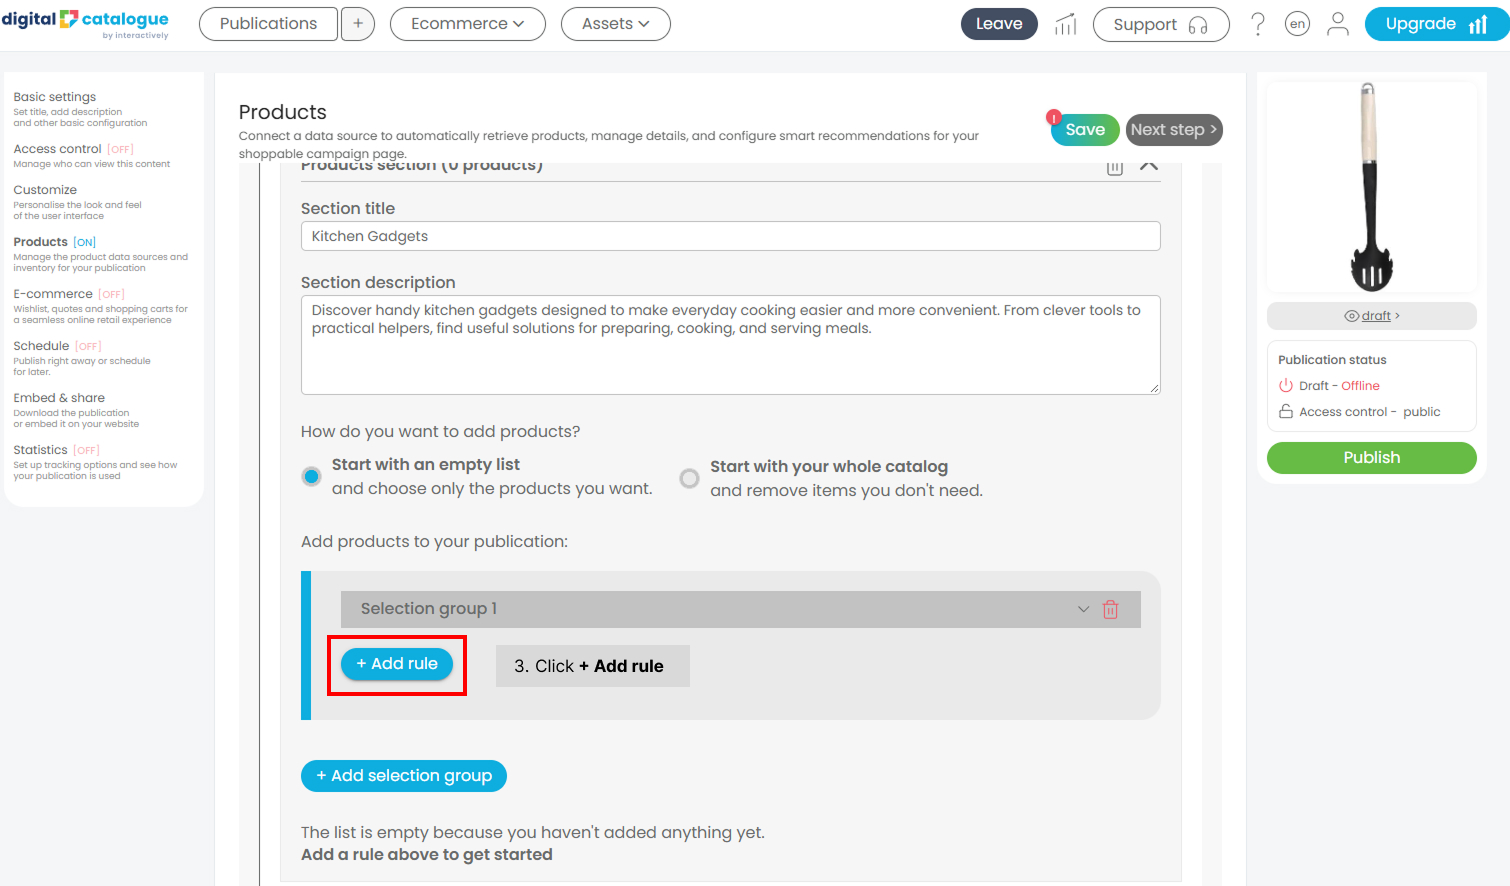
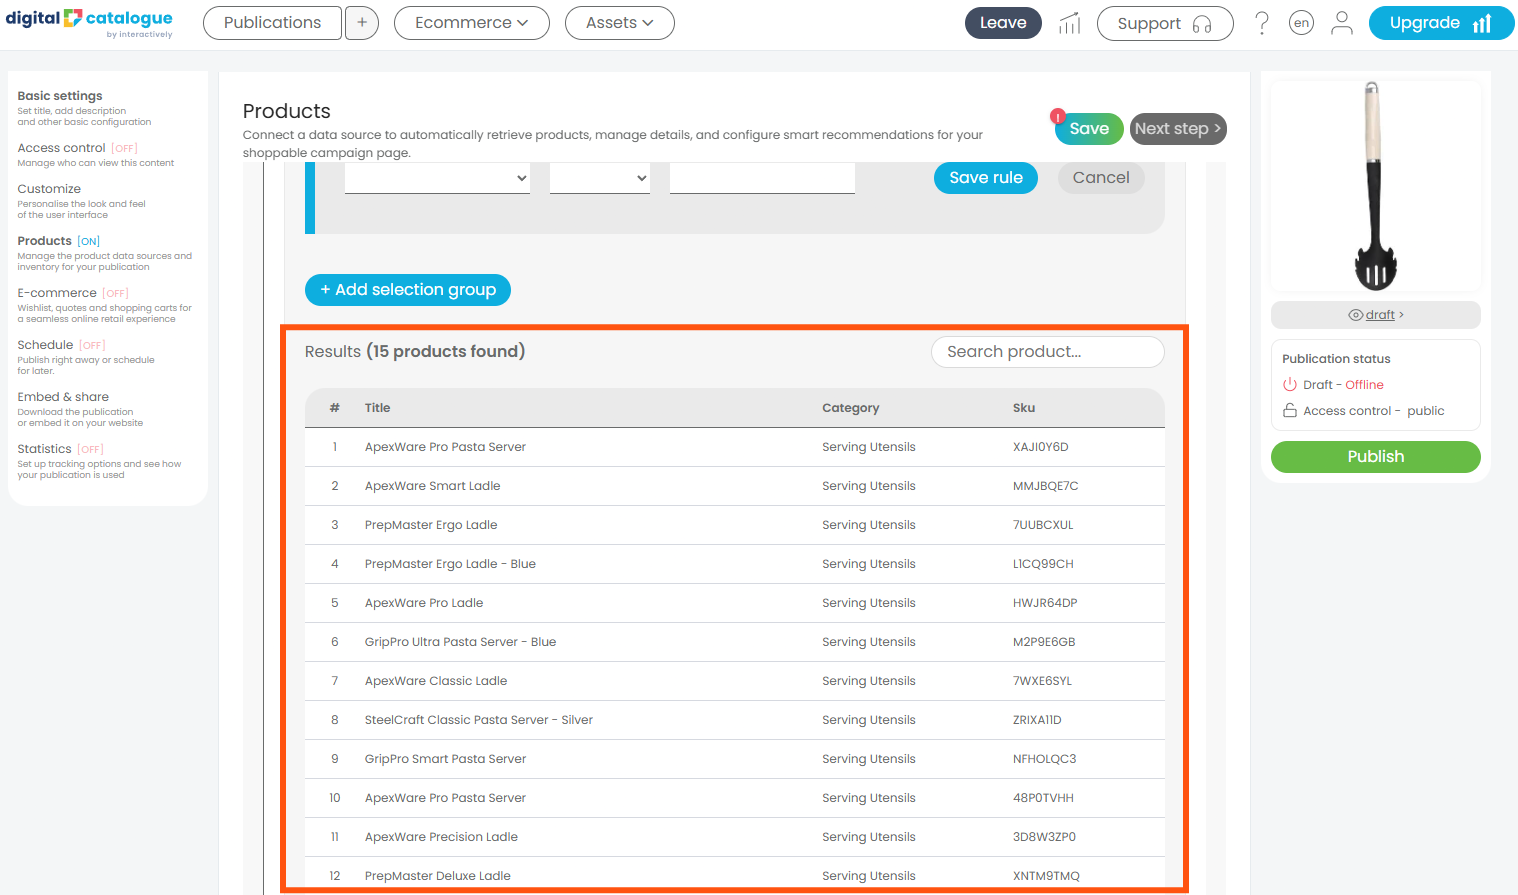
The system displays the products matching your rule, for example:
Results (15 products found)
These 15 products are now part of your selection.
To add more products, click + Add selection group again and repeat steps 2-5 with a new rule.
For example:
- Selection group 1: Category = Serving Utensils → 15 products
- Selection group 2: Category = Spatulas & Mixing Tools → 24 products
Your selection now contains 39 products.
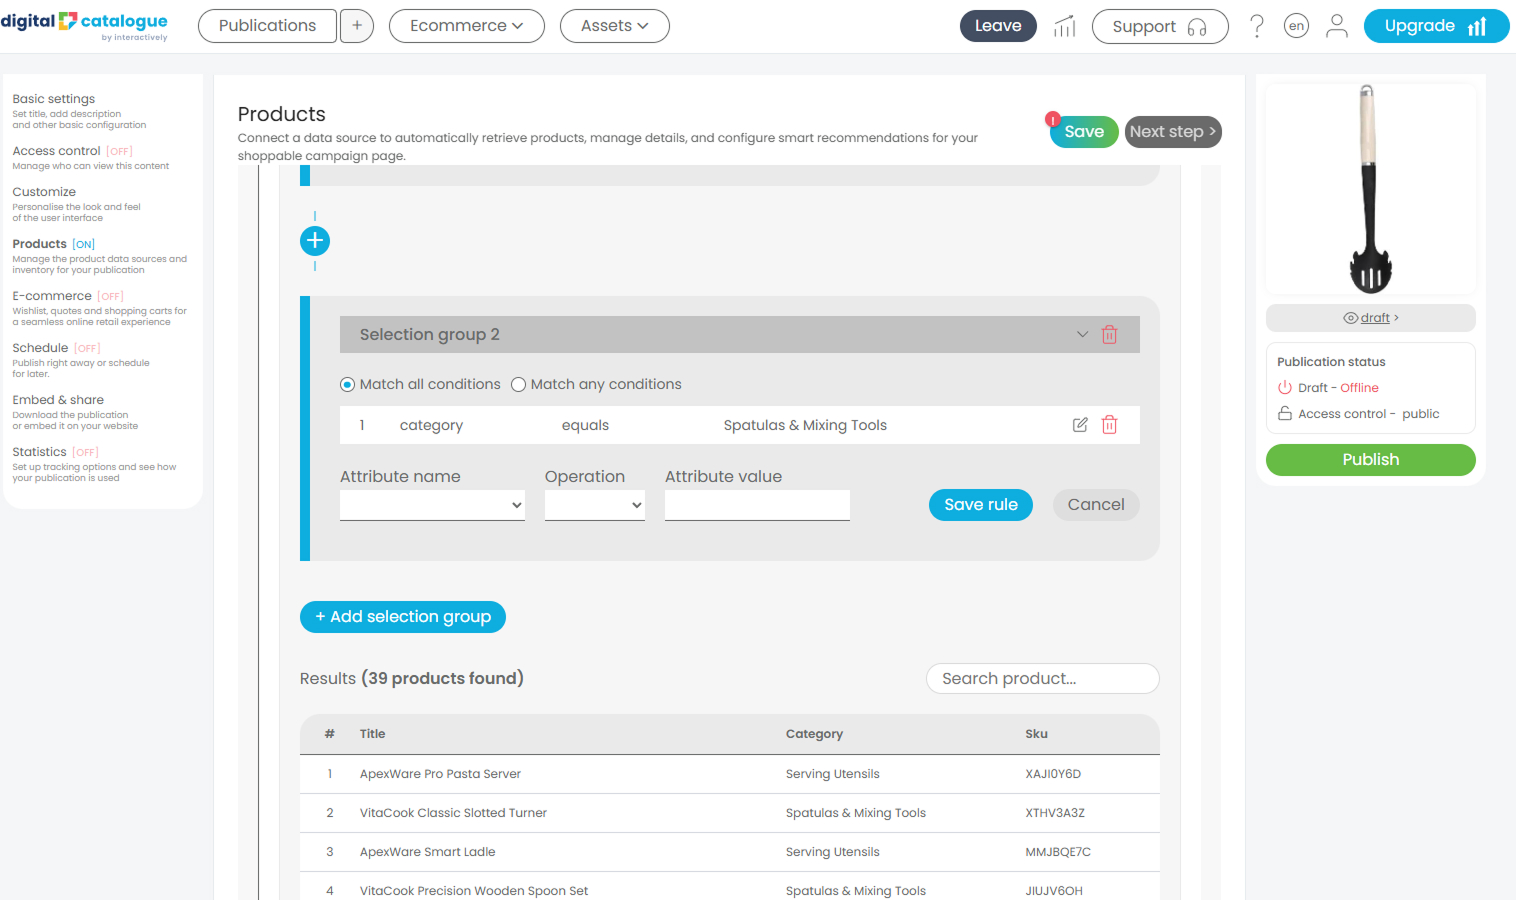
Use this option when you want to define which products should be included.
Option 2: Start with full product data
Choose this option when you want to show most of your catalog and only exclude a few items. All your products are included at first, and you create one or more selection groups, each containing rules that define which products to remove.
Example: Create a "Kitchen Essentials" section without serving utensils or ApexWare products
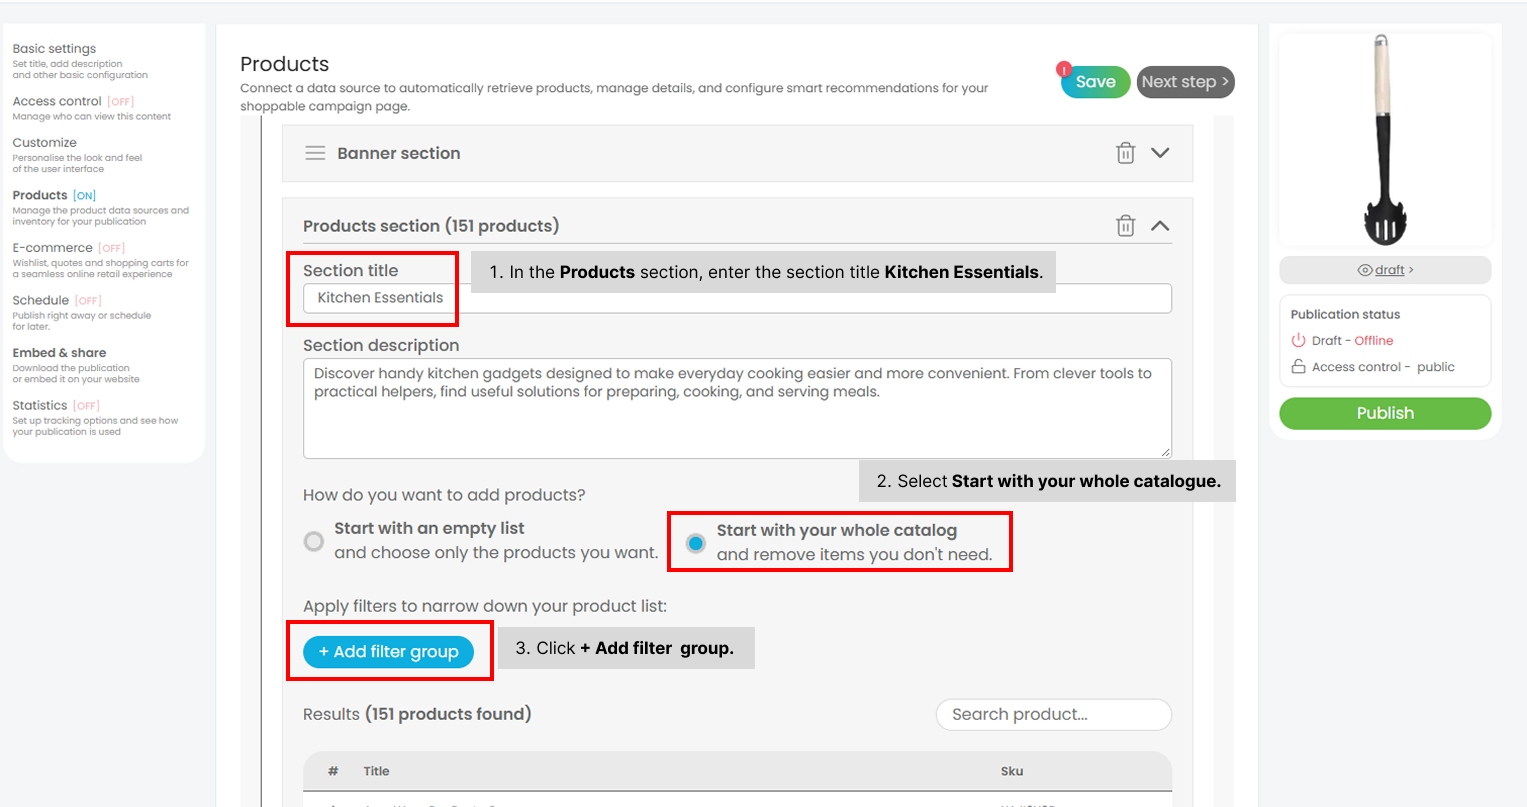
- In the Products section, enter the section title Kitchen Essentials.
- Select Start with your whole catalog. Your full catalog, 151 products, is now displayed.
- Click + Add filter group.
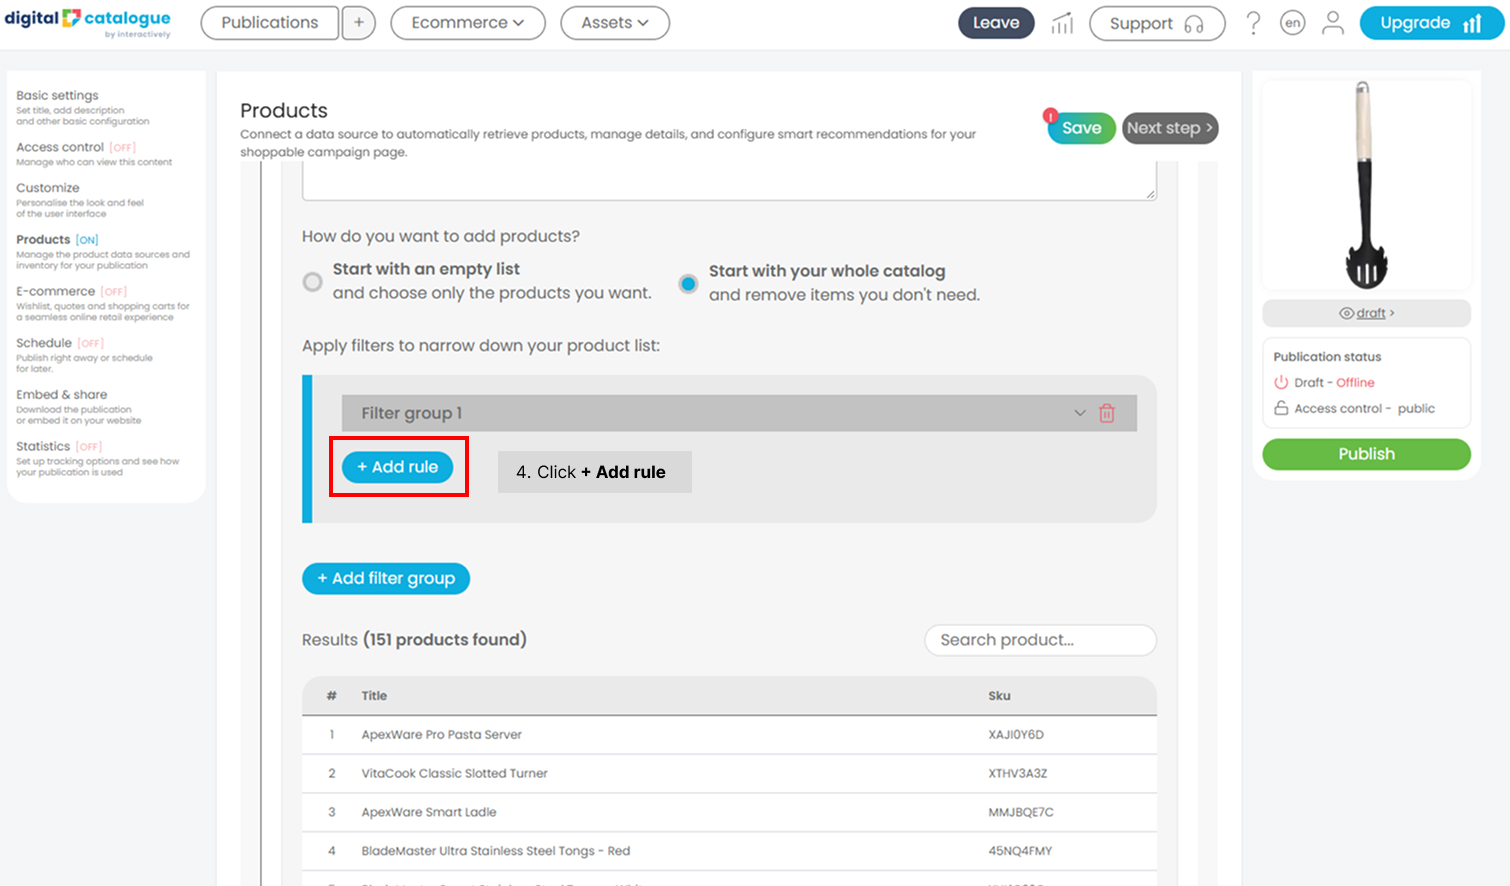
- Click Add rule.
- Define the rule for the products you want to remove:
- Attribute name: Category
- Operation: equals
- Attribute value: Serving Utensils
- Click Save rule.
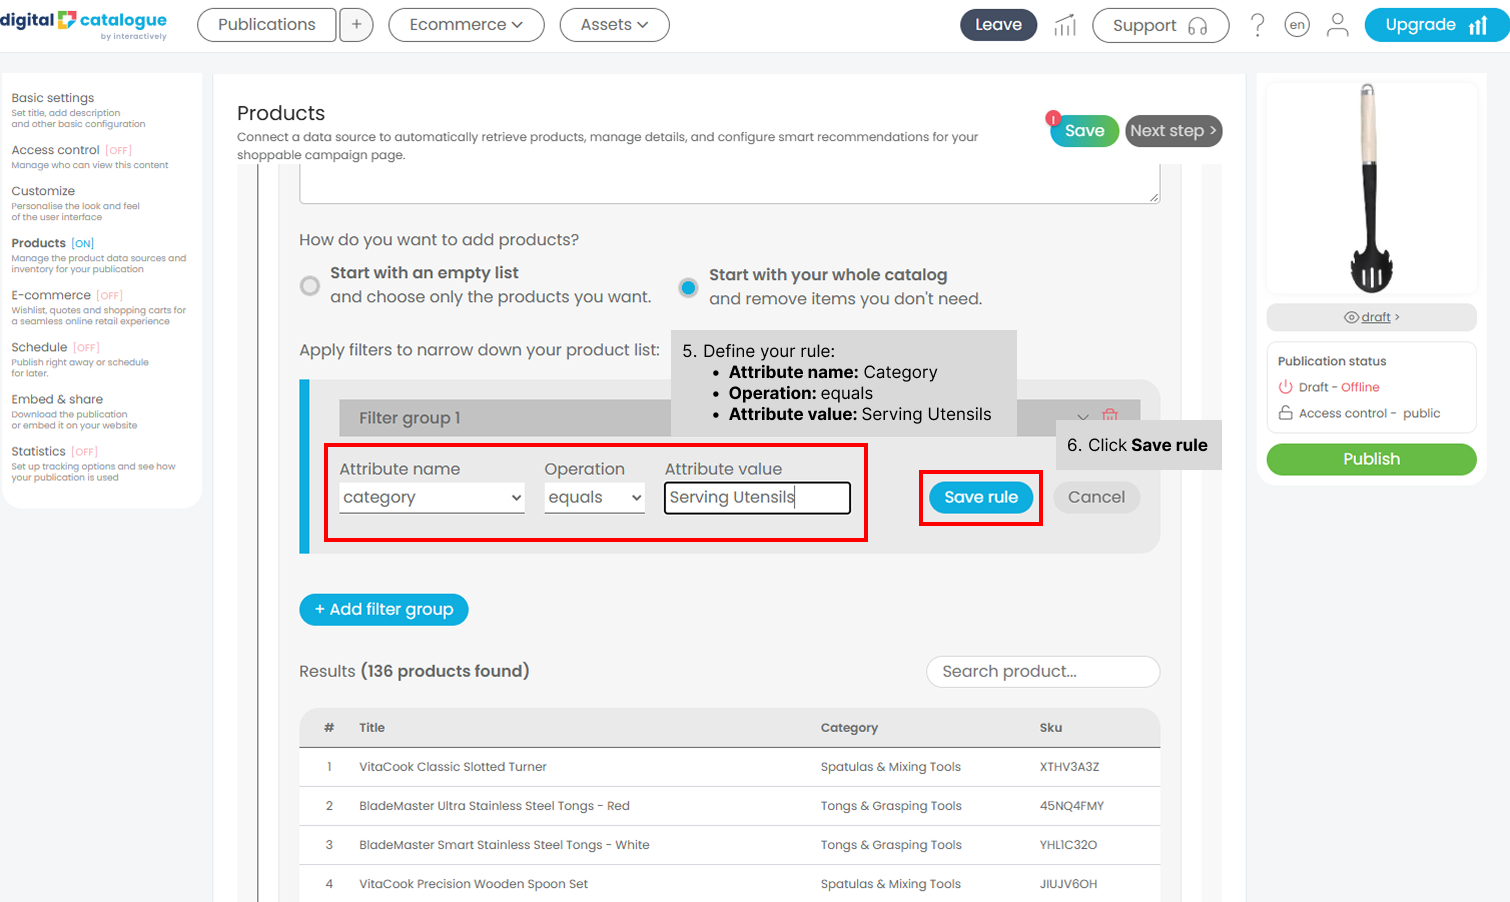
The matching products are removed from your selection. Results: 136 products remain (151 − 15).
To remove more products, click + Add filter group again and repeat steps 3-5 with a new rule. For example:
- Selection group 2: Brand = ApexWare → 8 more products removed. Your selection now contains 128 products.
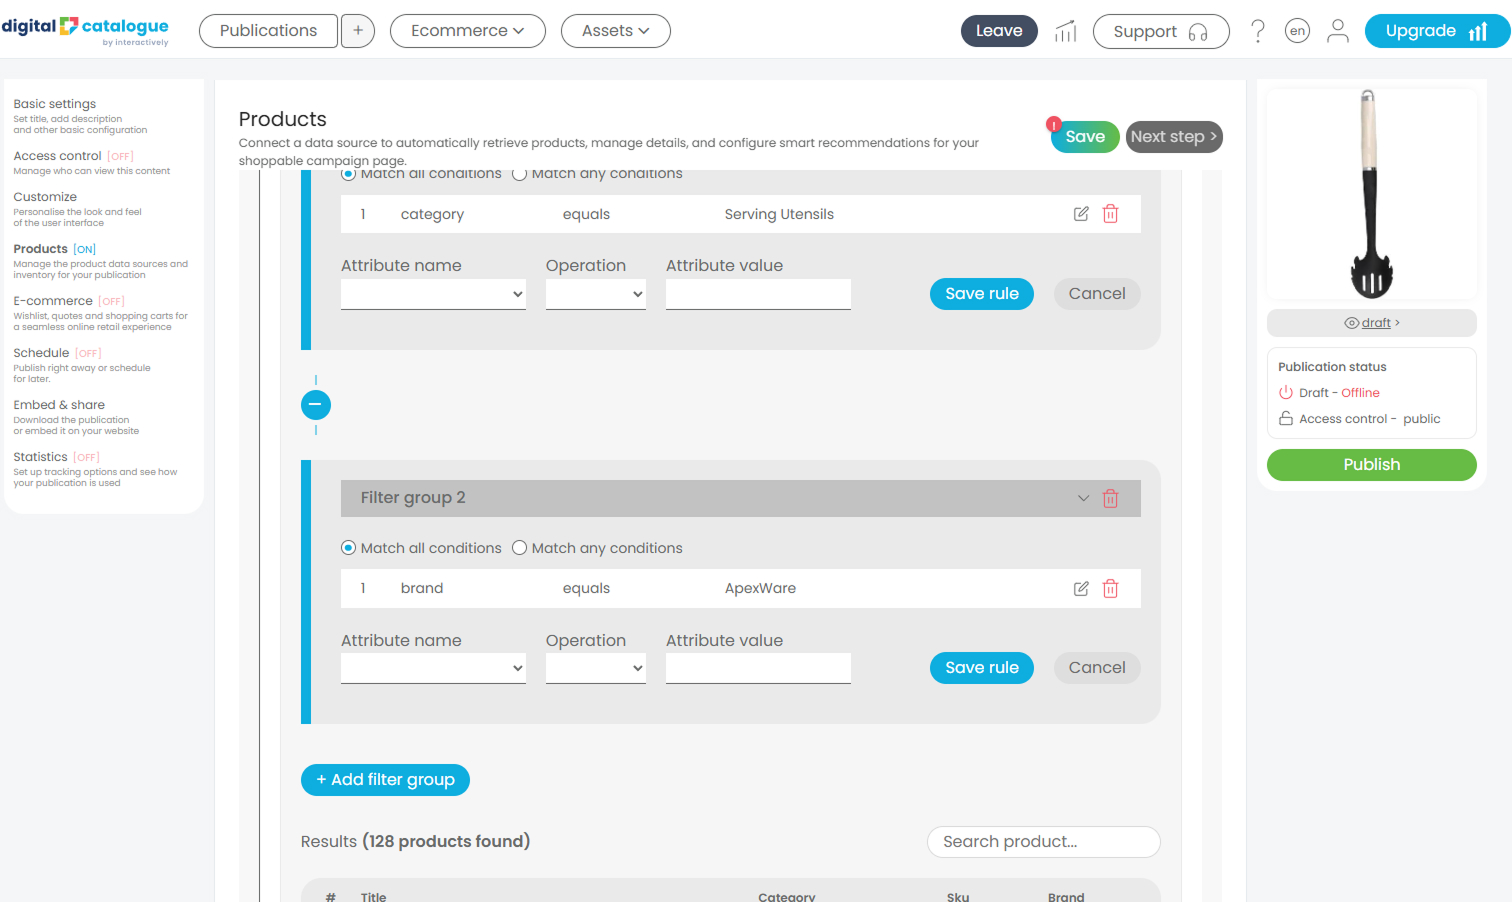
How product filters work
This applies to both options. When a selection group contains more than one rule, choose Match all conditions or Match any conditions at the top of the group to decide how the rules work together.
Note: In Option 1, matching products are added. In Option 2, they are removed.
Match all conditions (AND logic)
A product must meet every condition you set to be included.
For example:
- Category = “Serving Utensil”
- Price < 50
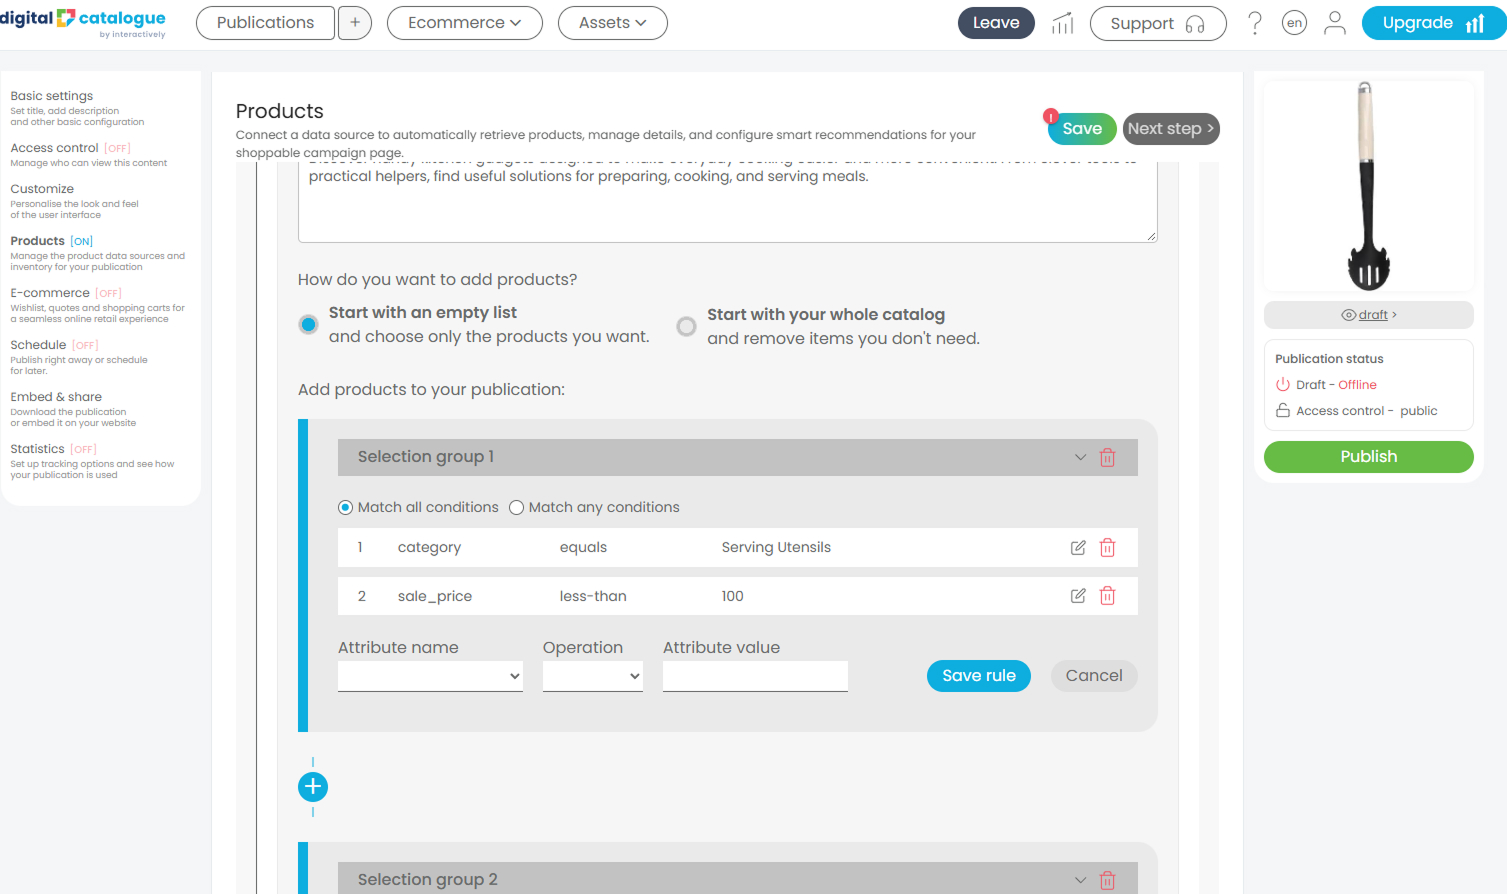
Only Serving Utensil priced under 50 will be included.
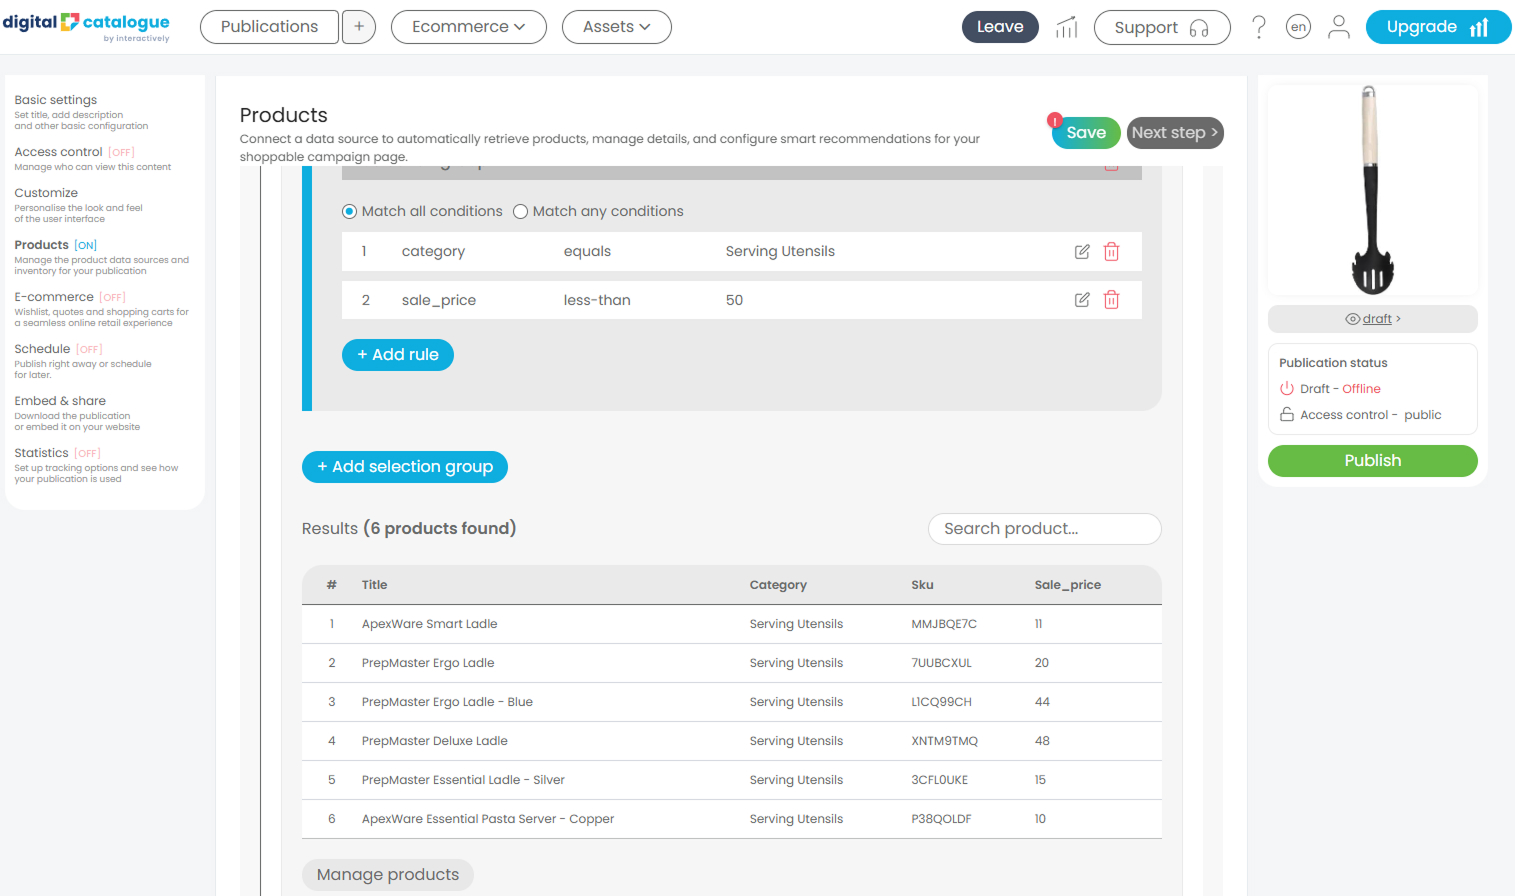
Match any conditions (OR logic)
A product only needs to meet one of the conditions to be included.
For example:
- Brand = “ApexWare”
- Brand = “VitaCook”
This includes all ApexWare products and all VitaCook products.
In other words, a product is included if either condition is true.
In short:
- Match all = stricter filtering, with fewer and more specific products.
- Match any = broader filtering, with more products.
Make sure you save your changes.
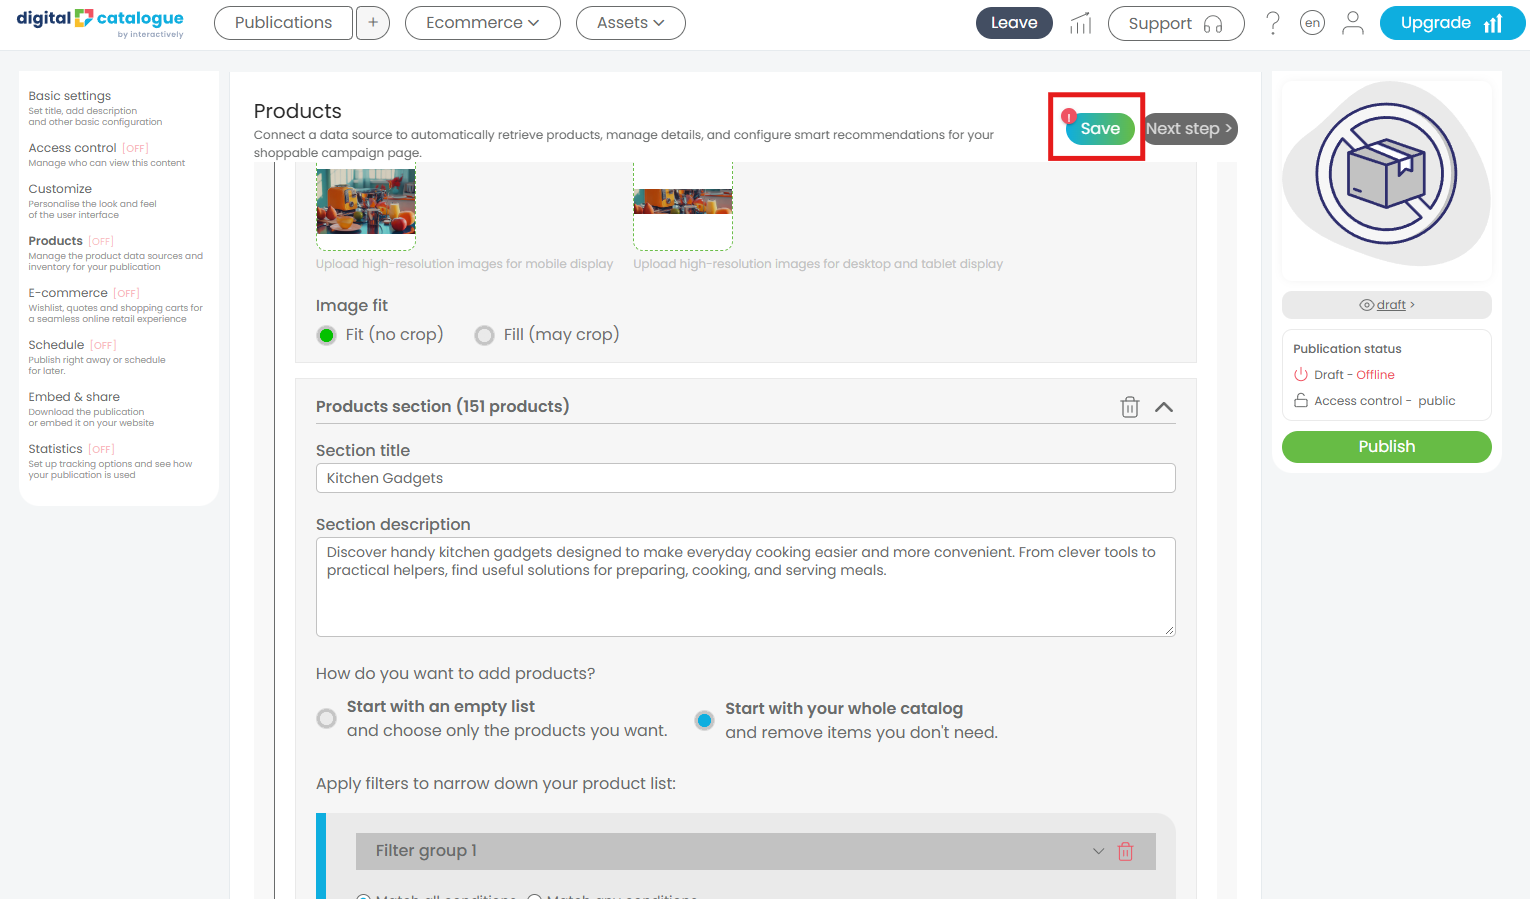
Build your page your way
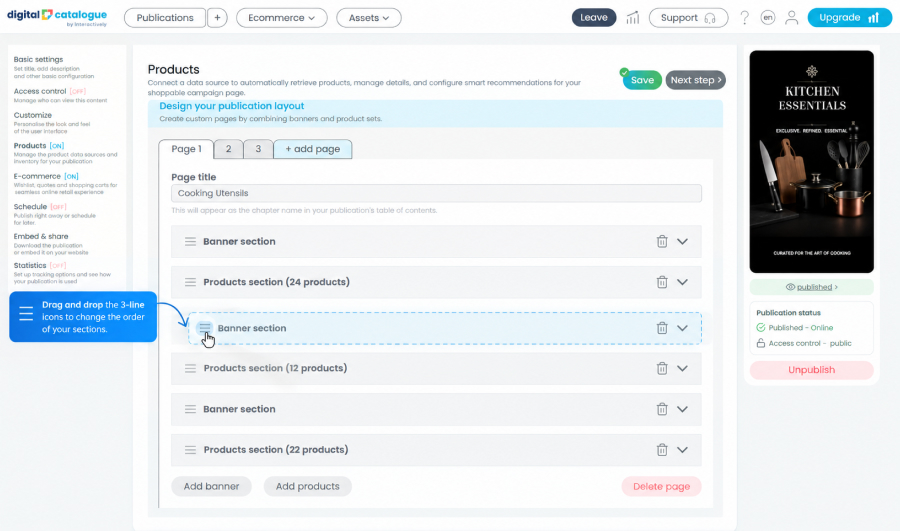
Add as many banners and product sections as you need. You can easily change their order by dragging and dropping the corresponding items in the list.
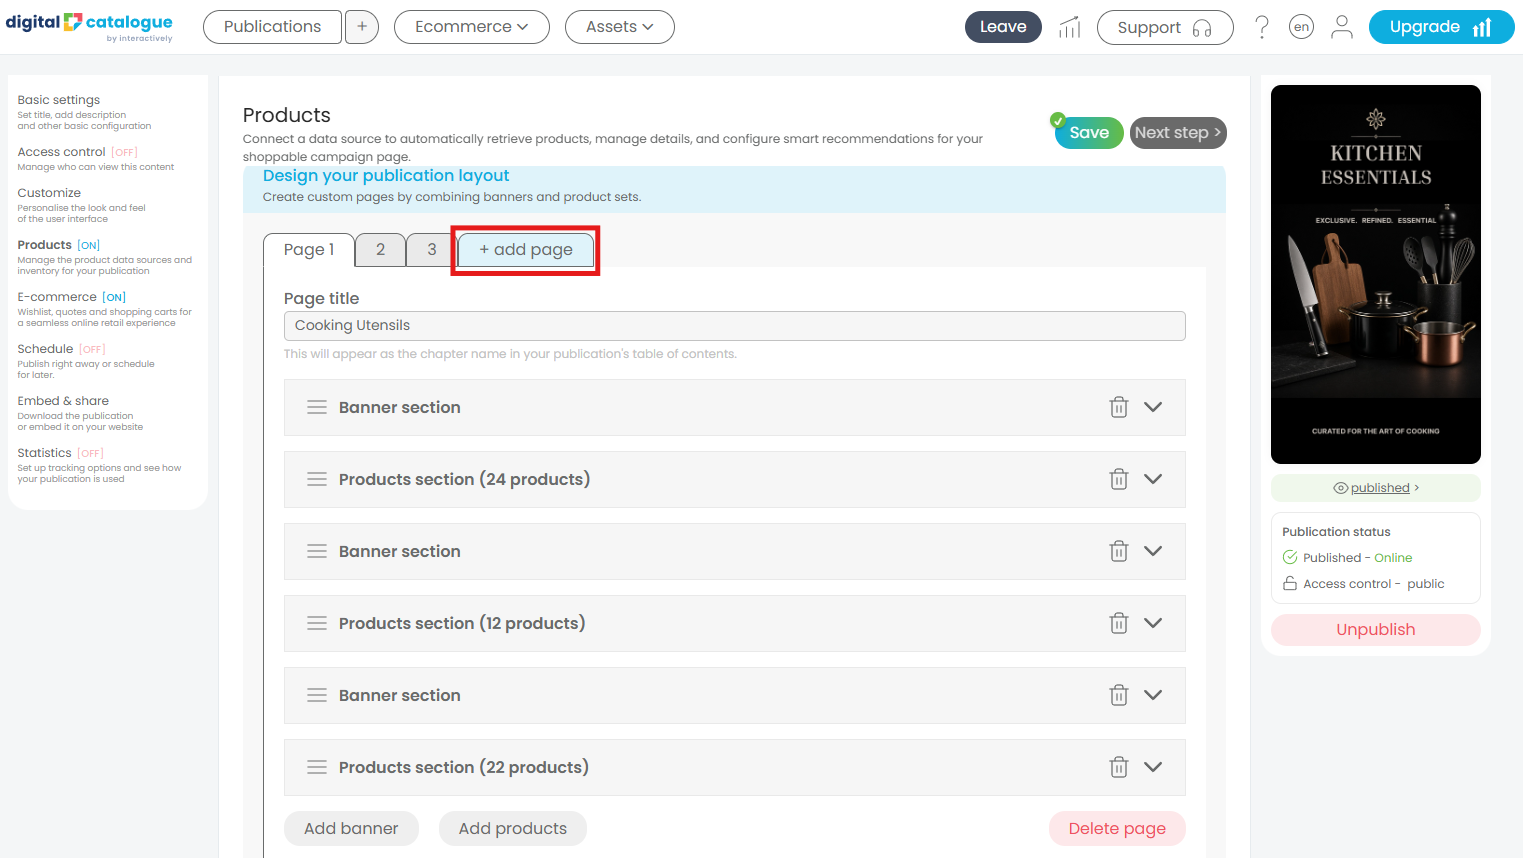
You can also create as many pages as you need, giving you complete flexibility to organize your campaign and products. Just click on the + add page tab.
Step 5. Complete your campaign setup
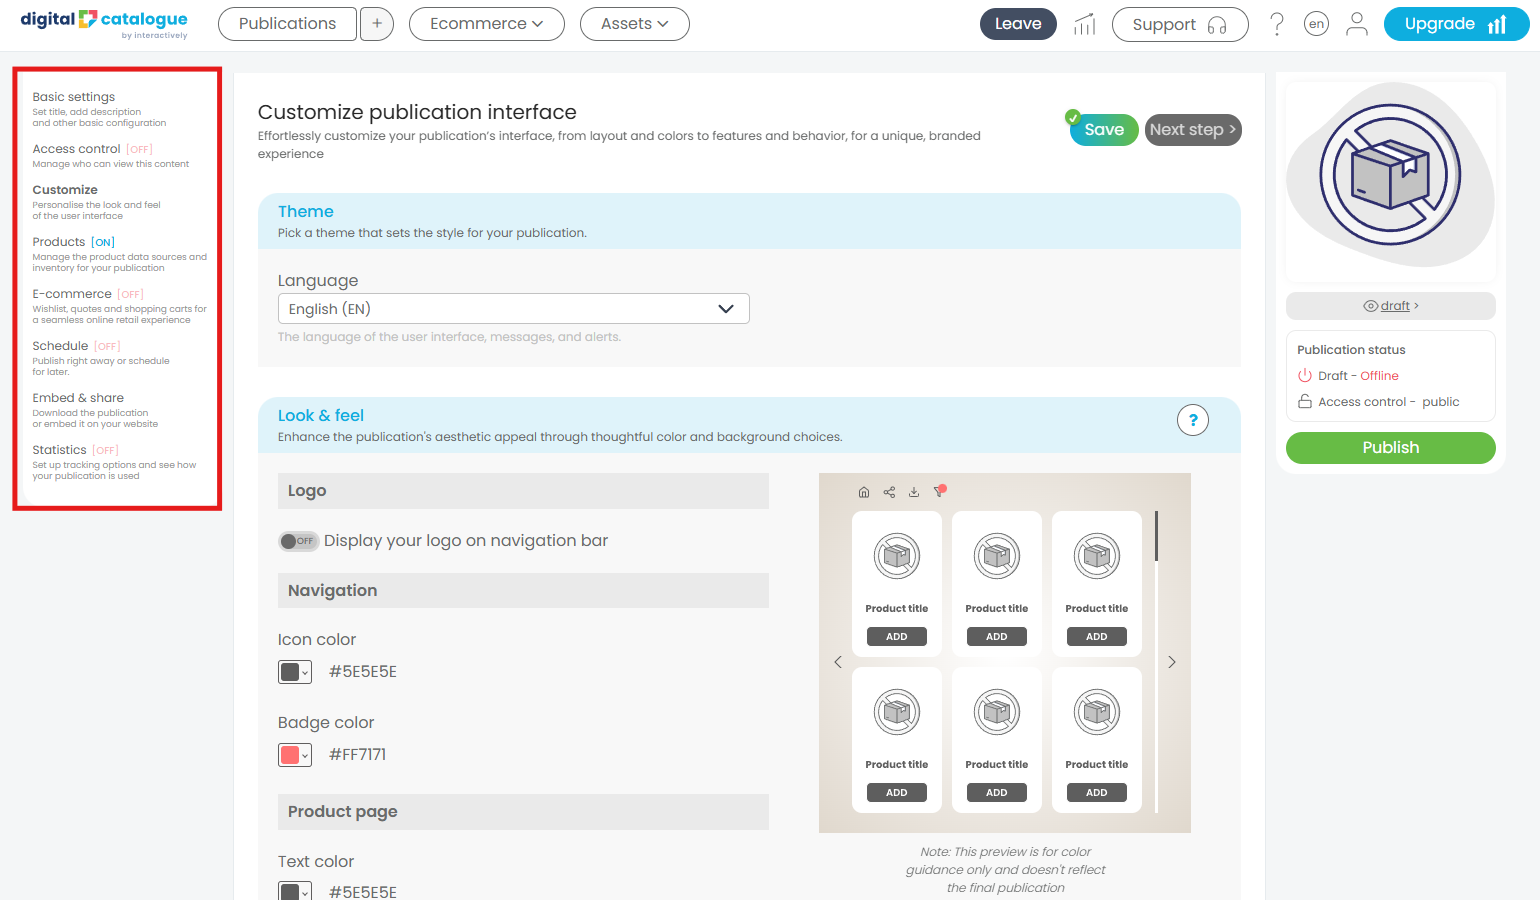
Once you’ve finished setting up your content, use the sections in the left-side menu to complete your campaign setup and create a more engaging, seamless experience for your customers.
Basic settings
Set your title and description to improve engagement and SEO. Create a unique URL for easy sharing and organize your publication into collections for easier management.
Access control
Choose how customers can access your publication after it is published. Keep it publicly available or restrict access to authorized users.
Customize
Customize your publication’s interface to match your brand, from layout and colors to features and behavior. Adjust the background and colors, and optionally add your logo and cover image for a more polished, branded experience.
E-commerce
Enable shopping features so customers can browse products, add items to their cart, and place orders directly through your publication.
Schedule
Publish your publication immediately or schedule it for a later date and time.
Embed & Share
Embed your publication directly into your website or share it using a direct link or on social media.
Statistics
Track your publication’s performance with insights into views, clicks, orders, and user activity to better understand engagement and sales.
For more information, check our dedicated tutorials covering these topics.